In the Video
Japanese【日本語】
English【英語】
1. Overview
We will do electronic work to post the image taken with the camera to LINE.
The product to be used is M5Stack’s TimerCamera (ESP32 built-in).
Implement HTTPS (TLS) client and LINE posting function in this product.
2. The development environment
Arduino was developed in Italy under the philosophy of “making things easier and easier to understand”.
Currently, it is widely used for learning all over the world, and the library is also substantial.
So, if you want to start electronic work, I think this is the only development environment.
Therefore, I use Arduino at this time.

3. LINE Settings
Configure LINE settings to obtain a token for access.
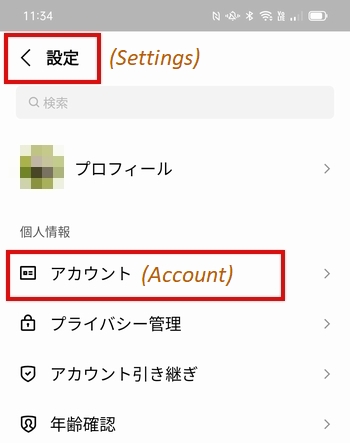
1) Select an account from “Settings” on the smartphone LINE app
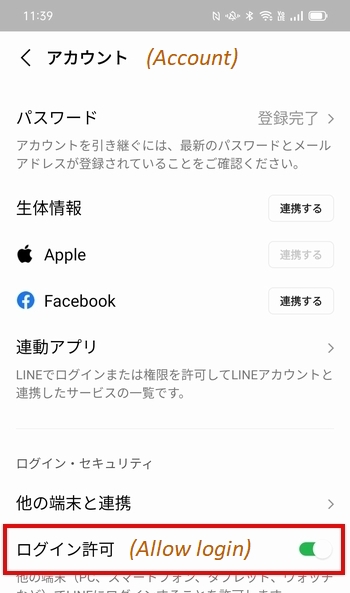
2) Turn on “Allow login”
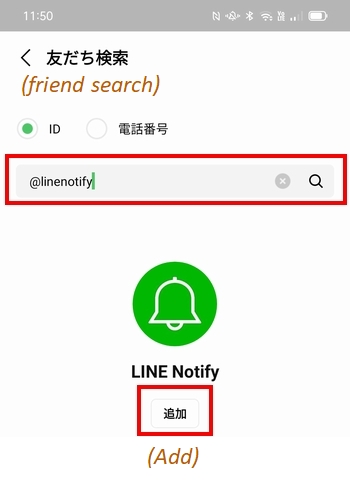
3) Add friends by searching for “@linenotify”
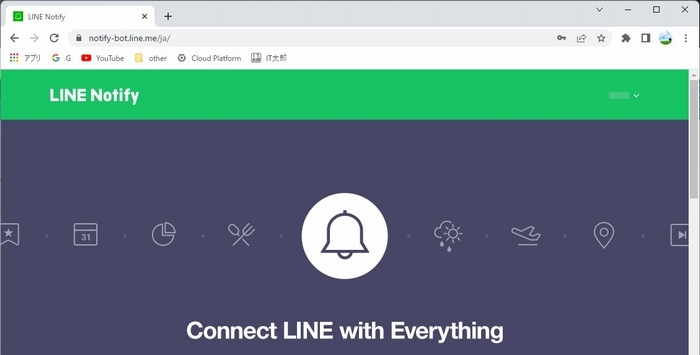
4) Access LINE Notify on your computer and log in with your LINE account.
5) Select “My Page” from the menu on the upper right
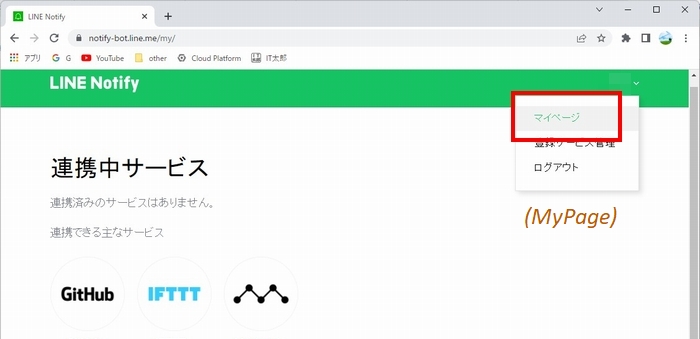
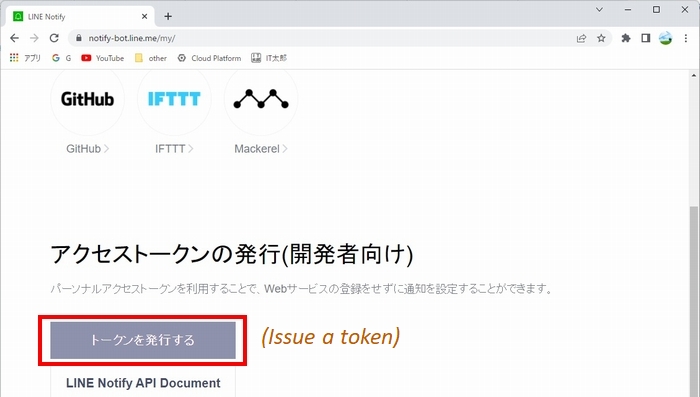
6) Issue a token.
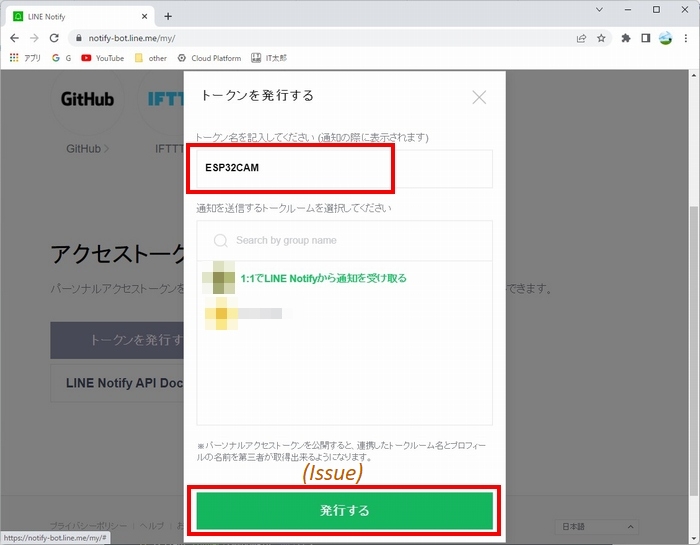
7) Enter the token name and issue.
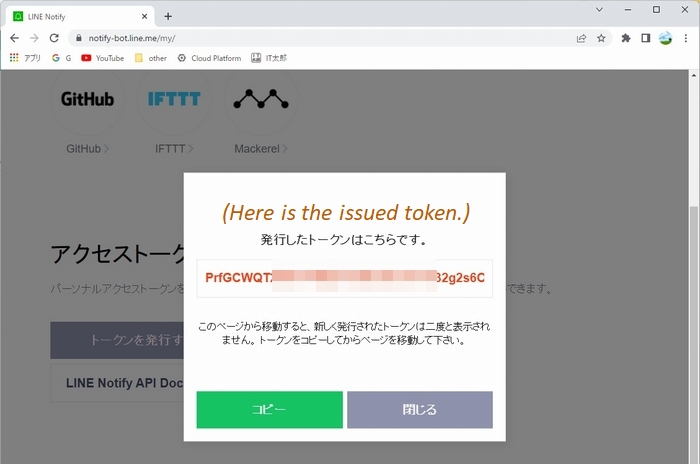
8) Get the issued token. (Recorded for inclusion in the program.)
4. Software
This is a Arduino program.
//*************************************************************************
//  M5TimerCAM POST LINE Ver2023.2.7
//  Arduino Board : M5Stack-Timer-CAM [M5Stack ver 2.0.6]
//  Written by IT-Taro
//***********************************************************************

#include <WiFi.h>
#include <WiFiClientSecure.h>
#include "esp_camera.h"

// ################ for Battery Use ###############
//#include "battery.h"
//#include "soc/rtc_cntl_reg.h" // for BrouwnoutDetector Disable

//#define BATTERY_ENABLE

// ##################### Line, Wi-Fi settings (Preferences) #####################
String lineToken        = "##### TOKEN ####"; // Line Token [★change required]

const char *ssid        = "##### SSID #####"; // [★change required]
const char *password    = "### PASSWORD ###"; // [★change required]
// ##############################################################################
const char* lineServer = "notify-api.line.me";

// LED Pin Setting
const byte LED_PIN      = 2;  // Green LED

// CAMERA_MODEL_M5_UNIT_CAM
#define PWDN_GPIO_NUM     -1
#define RESET_GPIO_NUM    15
#define XCLK_GPIO_NUM     27
#define SIOD_GPIO_NUM     25
#define SIOC_GPIO_NUM     23

#define Y9_GPIO_NUM       19
#define Y8_GPIO_NUM       36
#define Y7_GPIO_NUM       18
#define Y6_GPIO_NUM       39
#define Y5_GPIO_NUM        5
#define Y4_GPIO_NUM       34
#define Y3_GPIO_NUM       35
#define Y2_GPIO_NUM       32
#define VSYNC_GPIO_NUM    22
#define HREF_GPIO_NUM     26
#define PCLK_GPIO_NUM     21

// Global Values
WiFiClientSecure httpsClient;
bool ledFlag          = true; // LED Control Flag
camera_fb_t * fb;

// Setup Function
void setup() {
  Serial.begin(115200);

// For Battery Use
#ifdef BATTERY_ENABLE
  WRITE_PERI_REG(RTC_CNTL_BROWN_OUT_REG, 0); //disable   detector
  bat_init();
  bat_hold_output();
#endif
  //Serial.setDebugOutput(true);
  //Serial.println();

  // Camera Setting
  camera_config_t config;
  config.ledc_channel = LEDC_CHANNEL_0;
  config.ledc_timer = LEDC_TIMER_0;
  config.pin_d0 = Y2_GPIO_NUM;
  config.pin_d1 = Y3_GPIO_NUM;
  config.pin_d2 = Y4_GPIO_NUM;
  config.pin_d3 = Y5_GPIO_NUM;
  config.pin_d4 = Y6_GPIO_NUM;
  config.pin_d5 = Y7_GPIO_NUM;
  config.pin_d6 = Y8_GPIO_NUM;
  config.pin_d7 = Y9_GPIO_NUM;
  config.pin_xclk = XCLK_GPIO_NUM;
  config.pin_pclk = PCLK_GPIO_NUM;
  config.pin_vsync = VSYNC_GPIO_NUM;
  config.pin_href = HREF_GPIO_NUM;
  config.pin_sscb_sda = SIOD_GPIO_NUM;
  config.pin_sscb_scl = SIOC_GPIO_NUM;
  config.pin_pwdn = PWDN_GPIO_NUM;
  config.pin_reset = RESET_GPIO_NUM;
  config.xclk_freq_hz = 20000000;
  config.pixel_format = PIXFORMAT_JPEG;
  // Image size setting:QVGA(320x240),CIF(400x296),HVGA(480x320),VGA(640x480),SVGA(800x600),XGA(1024x768)
  config.frame_size = FRAMESIZE_XGA;
  config.jpeg_quality = 10;
  config.fb_count = 2;

  // camera init
  esp_err_t err = esp_camera_init(&config);
  if (err != ESP_OK) {
    Serial.printf("Camera init failed with error 0x%x", err);
    return;
  }
  /*sensor_t *s = esp_camera_sensor_get();
  // initial sensors are flipped vertically and colors are a bit saturated
  s->set_vflip(s, 1);       // flip it back
  s->set_brightness(s, 1);  // up the blightness just a bit
  s->set_saturation(s, -2); // lower the saturation*/

  // ####### PIN setting start #######
  pinMode ( LED_PIN, OUTPUT );

  // ####### Wireless Wi-Fi connection #######
  WiFi.begin ( ssid, password );
  while ( WiFi.status() != WL_CONNECTED ) { // infinite loop until connected
    // LED flashes every second while connected
    ledFlag = !ledFlag;
    digitalWrite(LED_PIN, ledFlag);
    delay ( 1000 );
    Serial.print ( "." );
  }
  // Wi-Fi connection completed (IP address display)
  Serial.print ( "Wi-Fi Connected! IP address: " );
  Serial.println ( WiFi.localIP() );
  Serial.println ( );
  // LED lights when Wi-Fi is connected (Wi-Fi connection status)
  digitalWrite ( LED_PIN, true );

  // ####### HTTPS certificate check setting #######
  // Skip Server certificate check (required since 1.0.5)
  httpsClient.setInsecure();//skip verification
  //httpsClient.setCACert(rootCA);// It is also possible to obtain a root certificate in advance using a web browser and set rootCA

  // ####### Get Image #######
  Serial.println("Start get JPG");
  getCameraJPEG();
  // ####### Post to LINR CLOUD #######
  Serial.println("Start Post Line");
  postLine();

  Serial.println("Line Completed!!!");
}

// Loop Function
void loop() {
  delay(1);
}

// Post image to LINE
void postLine() {

  // Connect to LINE Cloud
  Serial.println("Connect to " + String(lineServer));
  if (httpsClient.connect(lineServer, 443)) {
    Serial.println("Connection successful");

    String messageData = "--foo_bar_baz\r\n"
                      "Content-Disposition: form-data; name=\"message\"\r\n\r\n"
                      "ESP32CAM Post\r\n"; // message to display
    String startBoundry = "--foo_bar_baz\r\n"
                          "Content-Disposition: form-data; name=\"imageFile\"; filename=\"esp32cam.jpg\"\r\nContent-Type: image/jpeg\r\n\r\n";
    String endBoundry   = "\r\n--foo_bar_baz--";

    unsigned long contentsLength = messageData.length() + startBoundry.length() + fb->len + endBoundry.length();
    String header = "POST /api/notify HTTP/1.0\r\n"
                    "HOST: " + String(lineServer) + "\r\n" +
                    "Connection: close\r\n" +
                    "content-type: multipart/form-data;boundary=foo_bar_baz\r\n" +
                    "content-length: " + String(contentsLength) + "\r\n" +
                    "authorization: Bearer " + lineToken + "\r\n\r\n";

    Serial.println("Send JPEG DATA by API");
    httpsClient.print(header);
    httpsClient.print(messageData);
    httpsClient.print(startBoundry);
    // JPEG data is separated into 1000 bytes and POSTed
    unsigned long dataLength = fb->len;
    uint8_t*      bufAddr    = fb->buf;
    for(unsigned long i = 0; i < dataLength ;i=i+1000) {
      if ( (i + 1000) < dataLength ) {
        httpsClient.write(( bufAddr + i ), 1000);
      } else if (dataLength%1000 != 0) {
        httpsClient.write(( bufAddr + i ), dataLength%1000);
      }
    }
    httpsClient.print(endBoundry);

    Serial.println("Waiting for response.");
    while (httpsClient.connected()) {
      String line = httpsClient.readStringUntil('\n');
      if (line == "\r") {
        Serial.println("headers received");
        break;
      }
    }
    while (httpsClient.available()) {
      char c = httpsClient.read();
      Serial.write(c);
    }
  } else {
    Serial.println("Connected to " + String(lineServer) + " failed.");
  }
  httpsClient.stop();
  Serial.println();
  Serial.println("Finish httpsClient");
}

// Get JPEG image with OV3660
void getCameraJPEG(){
  fb = esp_camera_fb_get();  // Get JPEG image
  if (!fb) {
    Serial.printf("Camera capture failed");
  }
  Serial.printf("JPG: %uB ", (uint32_t)(fb->len));
  Serial.println();
  // Shooting end processing
  esp_camera_fb_return(fb);
}
5. PartsList
As a web camera for electronic work, it compares the prices of items used.


Comments